
-
How to Make Sauerkraut
Category: Fermenting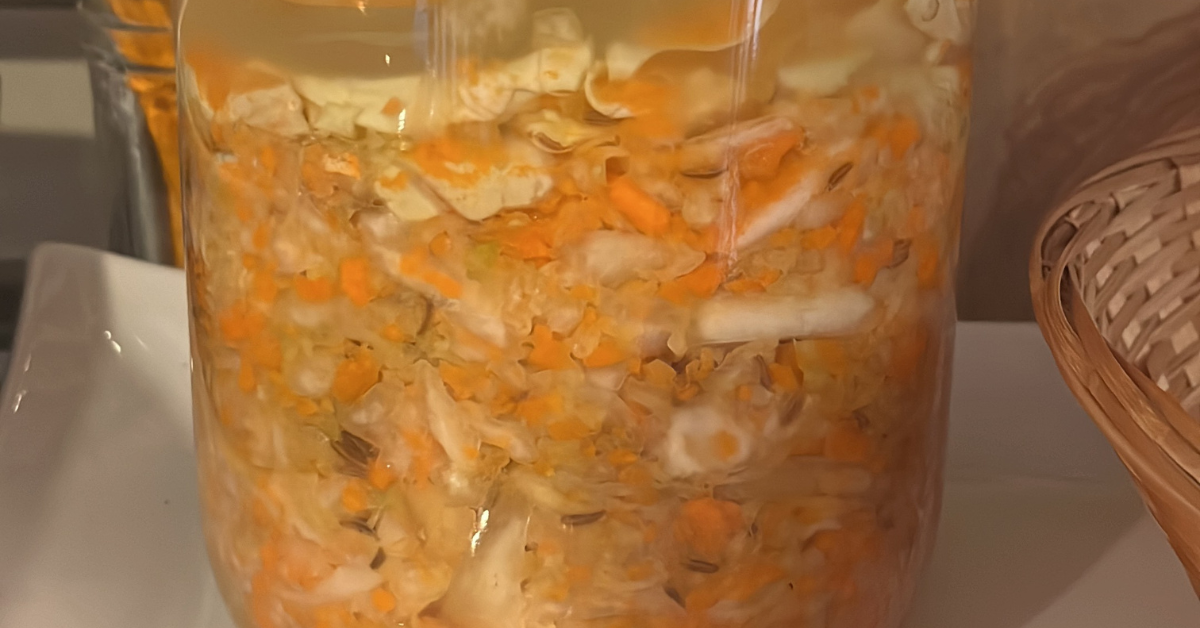
Learn how to make sauerkraut with these easy step by step instructions. Sauerkraut is a superfood (my opinion) with a ton of health benefits. It's not just something you put on top of a hot dog, it is so much more. Sauerkraut is essentially fermented cabbage, along with other optional veggies. It contains the friendly probiotic bacteria your body needs for healthy digestion and strong immune function.
Health Benefits of Sauerkraut
Cabbage alone is cruciferous vegetable high in vitamins A and C. Studies have shown that cruciferous vegetables can help lower cholesterol levels and combat cancer. Additionally, cabbage is a rich source of phytonutrient antioxidants and has anti-inflammatory properties. Fermenting cabbage to make sauerkraut amplifies the health benefits and makes this a superfood.
Probiotics in Sauerkraut
Healthy human colons contain many beneficial bacteria that break down the foods that we eat. Without these beneficial bacteria the human digestive system is at risk to harmful parasites and yeasts which can result in the condition of candida. Sauerkraut provides a high density source of a wide range of beneficial live bacteria which assist in the digestive process.
Consuming a serving of sauerkraut can give your body as much of a health boost as many of the expensive probiotic supplements sold in stores. However, most commercially sold sauerkraut have lost most of their beneficial bacterial organisms due to processing or pasteurization. To obtain the most benefits from sauerkraut it's best to purchase it freshly made (unheated and unpasteurized), or learn how to make your own. It is a simple process to make sauerkraut therefore you can make it at home very easily.
Ingredients for Homemade Sauerkraut
There are really only two required ingredients:
- Cabbage
- Salt
Most people add some other ingredients for more flavor. Some vegetable and herb additions that some people use include:
- Apples
- Carrots
- Caraway seeds
- Turmeric
- Horseradish
- Hot peppers
- Garlic cloves
- Ginger
- Dill
- Fennel
- Beets
- Lemon
You can be creative and make your own combinations. I suggest you start with a very basic recipe the first time and then try different additions one by one until you find your favorite custom recipe.
What Kitchen equipment is needed?
You will need the following items:
- A glass jar – an airlock jar or fermenting crock is ideal but a regular mason jar will work.
- Glass fermentation weights
- A wooden fermentation tamper or spoon
How Much Salt do you Use in Sauerkraut?
The most widely used ratio is 2% weight of salt to weight of cabbage gives the best results. This means you add 2g of salt for every 100g of finely sliced cabbage. For reference, 1 tbsp. of salt weighs about 18 grams.
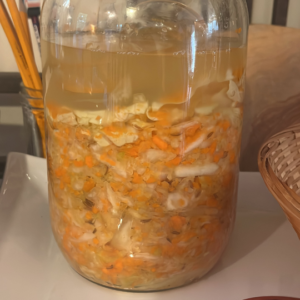
Homemade Sauerkraut
Equipment
- Mason jar, Airlock jar, or Fermentation Crock
- Glass fermentation weights optional, but helpful
Ingredients
- 1 head Cabbage red and/or green, shredded
- 2-4 Carrots grated
- 1 Apple grated
- 1 tbsp Caraway seeds optional
- 1-2 tbsp Sea salt
Instructions
- Shred cabbage into thin strips and put it into a large bowl. Save the outside leaves to use in the last step.
- Grate carrots and apple and add to the bowl. You can also add other vegetables if you wish. Add caraway seeds, if using.
- Weigh the vegetables to calculate salt amount needed (2% salt). Sprinkle salt on the shredded cabbage.
- Toss the cabbage to distribute the salt. Now comes the work, using your hands knead the cabbage like you would knead bread.
- Mix the cabbage and press down with the palm of your hands and squeeze out the juice of the cabbage. Do this for a few minutes until the cabbage looks a little broken down and juicy. If it is not that juicy, let it sit for 15-60 minutes.
- Spoon the cabbage mixture into a large glass jar or a fermentation crock and press down with a wooden spoon.
- The vegetables need to be completely covered in liquid. In order to do that it needs to be weighed down so that there is a little pressure on it.
- Place the outside cabbage leaves you reserved in step one on top of the shredded cabbage. This helps to keep it down under the liquid. If there is not enough liquid, you can add some water.
- Place glass fermentation weights on top of the vegetables and push down so the liquid rises. If you don't have weights use a ziplock bag of water as a weight. Insert an empty plastic bag into the jar with the opening of the bag outside the top of the jar and fill with water. Close up the bag and press down gently to release any air and then close the jar.
- Leave the jar alone to ferment for a minimum of 5 -21 days.
- If you are using a mason jar without an airlock open the jar once a day to let out some air.
- The longer you let the cabbage ferment the more different types of probiotics will form and it will taste stronger the longer it ferments. The time frame you could let it ferment is 5 to 30 days. Once you are done fermenting, removed the weights and whole cabbage leaves (discard) and spoon the sauerkraut into smaller jars and refrigerate.
Once you get the hang of it making sauerkraut is fun and easy. You can also make your own variations of this recipe by adding different vegetables. If you want to try more fermenting recipes, visit our fermenting page here.
Thank you for reading this post, don't forget to subscribe to stay in the loop. If you are looking for some of the healthy tools and resources mentioned in my articles, take a look at my healthy shopping guide.
Some of our links are affiliate links, which means if you click and buy, I earn a small commission. The price is the same for you, though. Thank you!
You might also like these posts…
-
Gluten-Free Pumpkin Pie Recipe
Category: Gluten Free
Gluten free pumpkin pie is just as good (if not better) then a typical pumpkin pie. It is also an easy pie recipe to make. Somehow I became the pumpkin pie expert in our family. I don't know exactly how that happened… I seem to remember one Thanksgiving many years ago my Grandmother loved the pie I made. After that I was required to make one every year! This pie recipe has been updated and refined year after year.
A pumpkin pie crust is typically made with wheat flour but this pie is make with a simple almond flour crust, making it gluten free. There is no rolling required so it's quick and easy to put together.
You can mix together this pie filling in a bowl with a whisk, a food processor, a vitamix or a hand mixer – whatever you prefer.
Gluten Free Pumpkin Pie
Pumpkin pie made with a gluten free crustIngredients
Crust
- 1 1/2 cups almond flour
- 1/4 tsp sea salt
- 1/2 tsp baking soda
- 1/4 cup coconut oil melted
- 2 tablespoons maple syrup
Pie Filling
- 2 cups pumpkin puree
- 3 eggs
- 1 can coconut milk
- ¾ cup maple syrup
- 1 tsp cinnamon
- 1 tsp ginger
- 1 tsp nutmeg
- ½ tsp allspice
- Pinch cloves
- 1 tsp vanilla extract
Instructions
- Preheat oven to 350 degrees.
- Mix all ingredients together and press into a 9″ pie plate.
- Bake for 10 minutes or until lightly browned. Let cool before filling.
- Next, mix together the filling.
- Preheat oven to 425°.
- Add all filling ingredients to a bowl and mix with a mixer or a whisk until blended well.
- Pour the filling batter into the pre-baked pie crust.
- Bake in oven for 15 minutes at 425° then reduce temperature to 350° and bake for 40 to 50 minutes or until knife inserted near center comes out clean.
Gluten Free Pumpkin Pie Tips
- If you have extra filling that will not fit in your pie crust (sometimes this happens to me). bake it in a ramekin. It comes out like a pumpkin custard and it's quite delicious on it's own (or with whipped cream on top).
- Serve this pie with whipped cream or vanilla ice cream for a real treat.
- You can also bake this in a square or rectangle baking dish and cut into squares. Press the crust into the bottom of the pan only. Refrigerate before cutting.
- Canned pumpkin or a roasted whole sugar pumpkin both work great in this recipe. If you use a whole pumpkin, roast it and puree it before adding to the pie filling recipe.
Find more gluten-free recipes on this page.
Thank you for reading this post, don't forget to subscribe to stay in the loop. If you are looking for some of the healthy tools and resources mentioned in my articles, take a look at my healthy shopping guide.
Some of our links are affiliate links, which means if you click and buy, I earn a small commission. The price is the same for you, though. Thank you!
You might also like these posts…
-
Why Your Mattress is Toxic
Category: Self Care
Most likely, your mattress is toxic. Our world is full of toxins today – they are everywhere. Some people are aware of this now and are trying to at least minimize the toxins inside the home. Switching to green cleaning products, using zero VOC's paints, and changing from plastic food storage containers to glass are some of the ways that help. However, one household item in particular that has probably been overlooked is your mattress. There are a number of reasons why conventional mattresses are very toxic and could even be causing health problems. Here are the top 4 reasons:
#1 – Flame Retardants
If your mattress contains flame retardants, your mattress is toxic. As of July 1, 2007, all U.S. mattresses are required to be flame retardant. As a result, manufacturers are coating them with highly toxic flame-retardant chemicals. These include PBDEs and substances that are known carcinogens. What is even worse is that this does NOT have to be disclosed in any way.
PBDEs are certainly not something we want emitting from a mattress on which we spend 1/3 of our lifetime. PBDEs are already outlawed in Canada and Europe. This toxin builds up in your body over time, and what you absorb or inhale does not go away. It's concerning because of the health problems PBDE is associated with. Including, brain and reproductive damage, decreased sperm quality, thyroid problems and even cancer at high levels.
The Consumer Product Safety Commission has studied chemically treated mattresses and found that the chemicals do, in fact, leech from the mattress. A person sleeping on a chemically treated mattress will absorb .8 mg of antimony every night. This amount that is 27 times more than the EPA says is safe.
#2 – Formaldehyde
Formaldehyde is another reason your mattress is toxic. It is often part of the flame retardants in mattresses and it is also used in the adhesives that hold together different pieces of the mattresses. This is a potentially toxic substance and has been linked to asthma, allergies, and lung, nose, and throat cancers.
#3 – Pesticides
Non-organic cotton is grown with pesticides. In fact, cotton uses more insecticide than any other single crop. These pesticides are causing illness too. In a 2002 study of pesticide illnesses in California, cotton ranked third among California crops for total number of worker illnesses caused by pesticides. If these chemicals are causing worker illness we probably don't want to be breathing in its emissions all night long.
#4 – Polyurethane
Since the 1960s, most mattresses have been made of polyurethane foam. Polyurethane is a petroleum-based material that emits volatile organic compounds that can cause respiratory problems and skin irritation. This is the material that memory foam mattresses are primarily made from. It is also part of the padding in coil mattresses.
If your Mattress is Toxic, Replace it.
These things apply to most mattresses that are sold today but there are some alternatives.
Natural Latex Mattress
Natural Latex is a safe alternative to the popular polyurethane memory foam mattresses. 100% Natural latex begins as a liquid, extracted by ‘tapping' live rubber trees that grow in tropical climates. This process is just like tapping a Maple tree for the natural sap. The trees are not harmed and they provide a sustainable resource for natural latex. The liquid is then washed and whipped into a latex foam material. Then it is formed into the layers of a natural latex mattress. The best quality natural latex mattresses are then wrapped in organic cotton and wool. The wool layer gives the fire retardant protection that is needed to meet the standards for fire protection because wool is naturally fire retardant.
It is difficult because many of the options available are very expensive or don't have high quality standards. Fortunately, Plushbeds.com has a high-quality natural latex mattress called the Botanical Bliss Collection. It's made of 100% natural latex, organic cotton, and Joma New Zealand wool. I personally own a set of their natural latex pillows which I absolutely love (read my review here). I also own three mattresses from Plush Beds. This mattress is a good value based on other options with similar quality.
Organic Cotton & Wool Coil Mattress
Some people really prefer the traditional coil mattresses over latex. A few safe and chemical free options do exist. If you are shopping for this type of mattress look for one that is made of organic cotton and/or wool. Some non-toxic coil mattresses are made of organic cotton and have a wool wrapping (for its natural fire retardant properties). Others are made with 100% wool. When researching options for coil mattresses be sure to ask if there are any other chemicals in the mattress. This could be any possible adhesives that hold the parts together.
These type of mattresses are not easy to find and could even require a prescription from a Doctor or a Chiropractor. There are a number of online retailers that offer organic coil mattresses.
Being aware of these toxins is not easy because once you know about this it's impossible to go back. Most likely you'll never want to buy a conventional mattress again. It's not that simple though because it is a high ticket item. The important thing is that you now know how to make an informed mattress purchase when you can. Take this slow and just replace the mattresses in your home one by one.
Thank you for reading this post, don't forget to subscribe to stay in the loop. If you are looking for some of the healthy tools and resources mentioned in my articles, take a look at my healthy shopping guide.
Some of our links are affiliate links, which means if you click and buy, I earn a small commission. The price is the same for you, though. Thank you!
You might also like these posts…
Trending Posts on the Holistic Mama Blog

Holistic Mama Blog